
Purpose
Accurate and timely claim follow-up is critical for maintaining a healthy revenue cycle. A consistent follow-up process ensures that claims are actively monitored, issues are resolved quickly, and payments are received without unnecessary delays.
This Standard Operating Procedure (SOP) outlines the recommended workflow for accessing, reviewing, troubleshooting, and managing insurance claims within CareStack to ensure efficient reimbursement.
Step 1: Access and Navigation
Before Managing Pending Claims, you must navigate to the Claims Dashboard.
Click on the System Menu (Grid icon) in the top right corner.
Select Claims from the Billing section.
Dashboard Overview
You will see a series of tabs. Each “tab” represents the life cycle of a claim:
Pending Submission: Claims ready to go or needing data correction.
Document Pending: Claims pending attachments.
On Hold: Claims paused for internal review.
Rejected: Claims rejected back by the clearinghouse or carrier.
Denied/Action Required: Claims processed by the carrier but not paid.
Pending Payments: Claims successfully sent and awaiting a check/ERA.
Pro Tip
Reviewing these tabs daily allows your team to quickly identify where attention is needed without having to manually search through all claims.
Common Error ⚠️
Users often stay only in Pending Payments and forget to monitor Rejected and Denied tabs—this leads to delays in payment and increased aging.
Step 2: Troubleshooting Rejections and Denials
Claims requiring attention will automatically land in “Rejected” or “Denied/Act. Req” Tabs. To ensure successful payment, please review these tabs and take the necessary corrective actions.
Navigate to the appropriate tab:
Both the Rejected and Denied/Act. Req tabs should be monitored daily and any claims found within these tabs should be immediately checked for any corresponding rejection reason(s) so necessary corrective actions can be taken.
Check the Reason
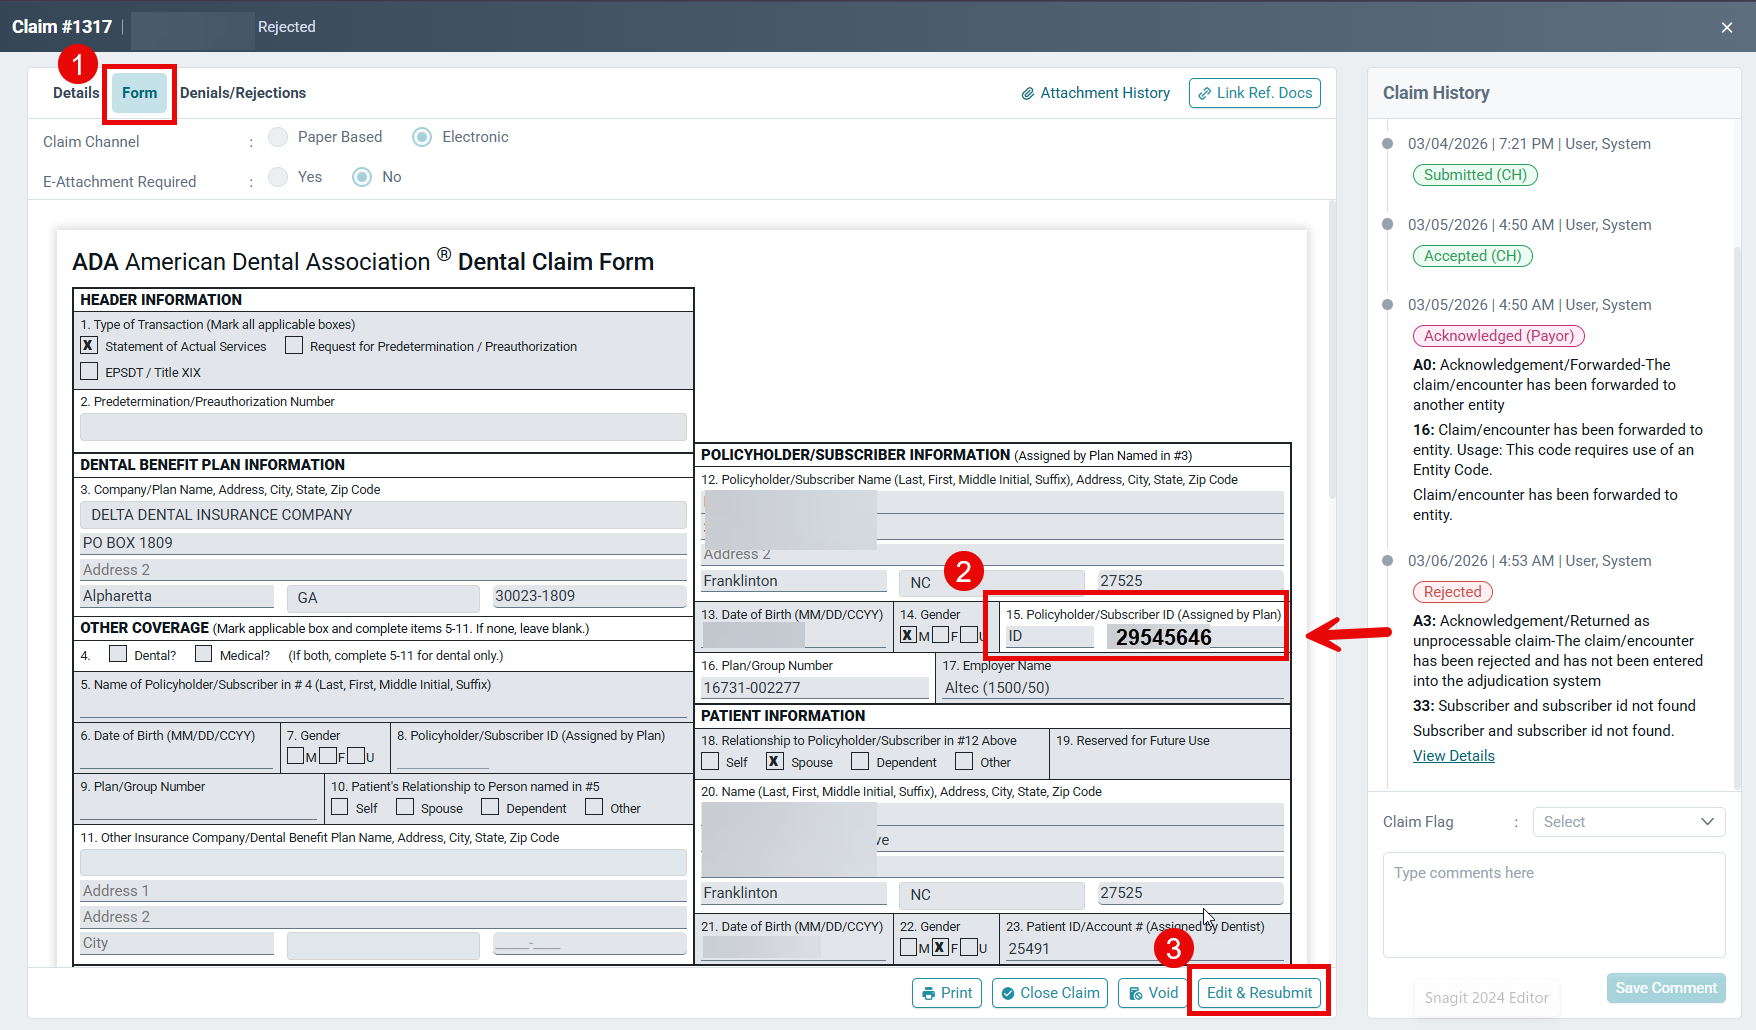
Click the claim and look at the Right Sidebar Claim History.
CareStack relays the rejection reason provided by the clearinghouse or carrier and displays it in the claim history section (e.g. Subscriber and subscriber is not found).
The “View Details” link in the sidebar may provide more information on a rejection if further clarification is needed.
Pro Tip
Always use the Right Sidebar + View Details before taking action—this ensures you are fixing the root cause and not just reworking the claim unnecessarily.
Common Error ⚠️
Reworking claims without reviewing the rejection reason often results in repeat rejections, increasing touches and delaying payment.
Confirm Information Sent
Depending on the rejection reason provided by the carrier or clearinghouse, different corrective actions will need to be taken.
As an example, if the rejection reason states that the subscriber could not be found, we should confirm all of the information relating to the subscriber has been entered into CareStack correctly by navigating back to the patient’s insurance window, double checking the appropriate information there such as:
Spelling of patient/subscriber name
Date of birth
Relationship to subscriber
Resubmitting a Corrected Claim
If it is determined that corrections need to be made
(e.g. an incorrect subscriber id was entered):
Click on the “Form” button at the top of the insurance claim in order to see a recreation of the insurance claim that was sent to the carrier.
You will see the “Edit & Resubmit” button at the bottom of that screen.
Make any necessary corrections and then click the “Save & Resubmit” button.
CareStack will ask for a Remark and in that field enter in the reasoning for why you are resubmitting the claim. The information entered in this remark is not sent to the carrier with the claim, but is simply for your records.
Pro Tip
Use the Remark field as an internal audit trail—this helps your team track what was corrected and reduces duplicate work.
Voiding a Claim
There are certain pieces of information on the claim that cannot be edited and would require the claim to be voided, recreated, and sent again.
Some examples of the fields are:
Procedure Codes
Subscriber Name, DOB, or Gender
Patient Name, DOB, or Gender
Steps
Ensure all necessary corrections are made to the patient or subscriber details (name, DOB, gender) and/or procedure code on the patient’s account prior to voiding the claim.
Click the Void button at the bottom of the Form window.
- Enter necessary remarks on reason for voiding
- When prompted to generate a new claim from the voided claim:
Common Error ⚠️
Automatically generating a new claim from a void without making corrections results in duplicate errors and additional delays.
Step Phase 3: Monitoring Pending Payments
Once a claim is successfully transmitted, it lives in the "Pending Payments" tab until it is paid or the claim has been closed.
Key Columns to Monitor
| 1 |
DOS The date of service associated with the claim. |
| 2 |
Last Updated The date of the last update on the claim, based on the “Claim History” sidebar when opening the claim. CareStack recommends that if a claim has not been touched within the last 30 days to follow up with the carrier to investigate the status of the claim. |
| 3 |
Ins. Expected This will show how much money we’re expecting insurance to pay on the claim. |
| 4 |
Carrier Shows which carrier the claim was sent to. |
| 5 |
Last Updated The date of the last update on the claim, based on the “Claim History” sidebar when opening the claim. CareStack recommends that if a claim has not been touched within the last 30 days to follow up with the carrier to investigate the status of the claim. |
| 6 |
Aging This column tracks how long it has been since the claim has been sent to insurance. |
| 7 |
Claim Flag You can create custom flags used to track the status of claims that you are following up on, such as Claim in Process, Mailed Claim, Under Appeal, Resubmitted, Submitted Additional Information, etc. |
| 8 |
Claim Status Current Status of the claim, it may say things like Acknowledged, Submitted, Pending, Resubmitted, Partially Paid, etc. |
Pro Tip
Start your day by sorting Aging → Descending to immediately target your highest priority claims.
Filtering Claims
Narrow down the list to make the workload more manageable using these examples as a jumping off point:
Filtering by Age
Click the filter icon in the Aging column.
Select a preset range (e.g., 90+ days) or define a custom range using
"Days greater than...".Click Apply.
Filtering by Carrier
Click the filter icon in the Carrier column.
Type the name of the carrier (e.g., "Delta").
Use Select All to include all variations of that carrier or manually select specific ones.
Click Apply.
Pro Tip
Use filters to create focused work queues (e.g., “90+ days Delta claims”) for faster follow-up.
Reviewing and Updating Individual Claims
Click on a specific claim from the filtered list to open the Claim Details modal.
Review the Claim History on the right-hand panel.
To Add an Update
Claim Flag: Select an appropriate status from the dropdown (e.g., "Check Reissue", "Authorization Required").
-
Comment Box: Type a detailed note regarding the follow-up
Example: "Called, spoke to rep Vicky; they are reissuing a check as of 03/01/2026"
Click Save Comment
The claim status and history will update automatically.
Pro Tip
Detailed comments create accountability and continuity across your team—any team member should be able to pick up where another left off.
Common Error ⚠️
Vague comments like “Called insurance” provide no value and lead to repeated work.