
This guide will walk you through the essential elements of the Scheduler within CareStack.
Topics Covered
- Date
- Filters
- Hidden Appointments
- Scheduler Reports
- Cancelled or No Show Appointments
- Scheduler View
- Extended/Normal Working Hours
- Legend
- Set Operatory Count
- Time Zone (Red Line)
- Compact View
- Provider's Availability
- Operatory
- Timeframe
- Production Types
- Production Schedules
Let's start on the Scheduler page.
Click the Scheduler icon to open and navigate the Scheduler.
| Note: The Scheduler's top-line formatting positions the day and date towards the left, while all your filters are placed on the right for smooth execution. |
Date
On the upper left, hover over the double arrow to select from one week to eight months.
- Click the date to open the calendar and select a specific date.
- Use the single arrow to navigate to the previous or next day.
You can switch between Day and Week views and Today's date.
- When you select Week view, it will display the day of the week alongside its corresponding date.
- Selecting Today directs you to the current day on the Scheduler.
If a patient is selected, you will see the patient's name beside the Today tab.
-
In the top middle is the Total Production of the codes added to the appointment for the day.
- It will be broken down by Production Type.
Filters
To choose your desired Scheduler View,
Click on the Filter at the top. To learn about managing Scheduler Filters, click here.
Select your Favorite Filter or create a Custom Filter.
To explore booking family appointments using Custom Filters, click here.
Hidden Appointments
When appointments are hidden due to scheduler filters or if a provider is unavailable, a Warning icon will appear on the scheduler for the selected date.
- Click on the Warning icon to view hidden appointments of the providers selected in the filter.
- To change the status of the appointment, click on the three-dot menu and select the required Status.
- You can also move the appointment to clipboard by selecting the Move to Clipboard option.
- Click Details to view appointment details.
Scheduler Reports
-
Click the Scheduler Reports icon.
- You can view details on recurring block conflicts that occurred during block slot creation.
The Scheduler Reports log provides information on:
- Location
- Scheduled by
- Scheduled At
- Status
Includes action buttons for each item on the report:
- Mark as Done
- Mark as Pending
- Download the Report
- Delete the Report.
Scheduler View
- Hover over and make the desired selection.
- You can switch your view from Patient to HIPAA, Production, Eligibility, or Claim View.
- In this example, the Production View is a Custom View.
To know more about configuring Scheduler Views, click here.
Extended/Normal Working Hours
Click the hourglass icon to toggle between normal and extended working hours.
- Select Print to print a copy of the Scheduler or Routing Slip.
-
View to be Printed: Select the view you want to print, such as
- Patient View
- HIPAA View
- Eligibility View
- Production View
- Claim View
- Filter By: Select if it is to be filtered based on Provider or Operatory.
- Print in: Select the print option in either Black & White or Color.
- Location: Select the Location.
- Provider: Select the Provider(s).
- Date: Select a Date from the calendar.
- Time: Select Time from the Time Picker.
Set Operatory Count
- Click the Set Operatory Count icon to adjust the number of columns on the Scheduler page.
- Use the angle brackets to toggle between the pages of the scheduler.
Compact View
The Compact View option condenses the scheduler screen, allowing users to view more hours at a time than in the normal view.
You can select the Compact View option towards the top right corner.
Here is how the Scheduler appears before and after enabling Compact View.
Without Compact View
With Compact View
Legend
- Hover over the three dot icon.
-
Click Legend to display the legend used in Appointment or Scheduler for:
- Appointment Status
- Appointment Labels
- Production Types
- Patient Flags
- Appointment Flags
Time Zone
- Hover over the three dot icon.
- Select System Time Zone or Eastern Standard Time Zone.
-
The displayed time zones are based on the location selected within the filter.
- To learn more, click here.
-
You will see a thin red line indicating the selected time zone.
- This shows the timeline the patient should be scheduled based on their time zone.
The red line will appear in both the Day and Week views to indicate the current time.
- You can see the Timeline on both sides of the Scheduler.
Provider's Availability
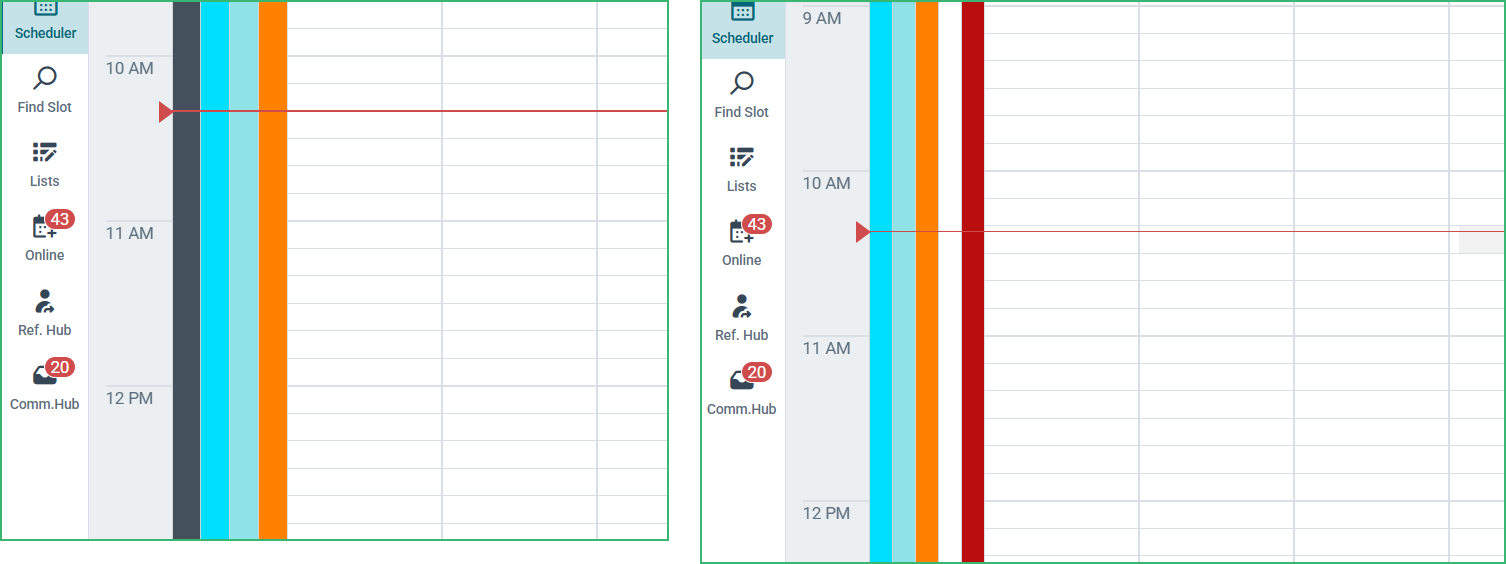
- On the left side, you will see distinct colors assigned to each provider.
- Crossed lines near the provider's colored band indicate scheduled appointments.
- This lets you easily spot available slots for patients on the scheduler.
| Note: When a provider is marked as unavailable, their availability band will be removed from the left side. For example, if a provider's availability is indicated by a black-colored band and they are marked as unavailable, the band will no longer be displayed |
 Operatory
Hover over the operatory to view:
- The name of the operatory.
- Location in which the provider is tagged against the specific operatory.
- The Production Value for the codes added in the appointments.
Timeframe
You can view the timeframe on either side of the Scheduler.
Production Types
-
Production types assigned to a time slot will be distinguished by color.
- Hover over the colored time slot to see the assigned production type.
Production Schedules
Each production schedule is represented by a distinct color in the scheduler calendar and the calendar widget. These colors act as visual cues, allowing users to quickly identify which days of the month follow a specific production schedule. Click here to learn how to configure schedule color.
Production schedules in the Scheduler are displayed differently depending on the practice type.
- In Ortho/Ortho + GP practices, production schedules are shown within the Calendar widget. To view them, click Open Toolbar at the bottom left.
- Production schedules are displayed in their assigned colors.
These essential elements will help you navigate the scheduler with confidence and efficiency.